通过 Docker Compose 实现 Invidious 的读写分离与性能优化,包含通用 Docker 与 1Panel 面板两种部署方案,大幅提升私有 YouTube 前端的响应速度。
🌟 核心架构亮点
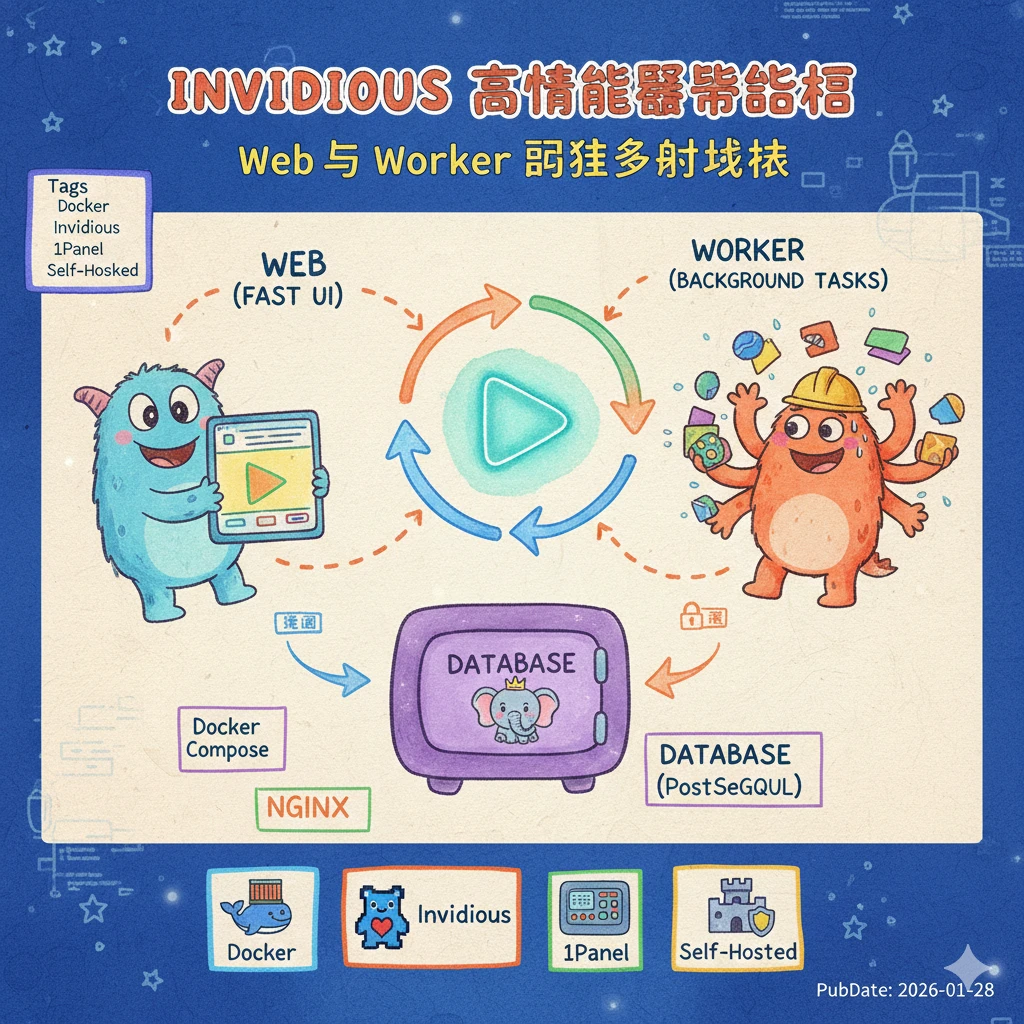
- 架构分离:专门的 Worker 容器处理耗时任务,Web 容器仅负责渲染,互不干扰。
- 资源隔离:针对性分配线程资源,防止内存泄露。
- 极速交互:关闭 Web 端的非必要数据库写入,提升并发处理能力。
- 网络优化:海外服务端 + 国内客户端依然能正常加载字幕(无需客户端代理)。
📚 官方资源引用
- 项目仓库:iv-org/invidious
- 官方文档:Invidious Documentation
🛠️ 部署前准备
无论使用哪种部署方式,都需要先准备好目录结构和初始化文件。
1. 规划目录
我们需要两个核心文件挂载到数据库容器中,用于初始化数据结构。
- 下载官方初始化 SQL 脚本:init-invidious-db.sh
- 创建如下目录结构:
invidious/
├── config/
│   └── sql/               # 存放额外的 SQL update 脚本(如有)
└── docker/
    └── init-invidious-db.sh
🚀 方式一:Docker Compose 通用部署 (CLI)
适用于所有 Linux 发行版,直接使用命令行管理。
1. 创建 docker-compose.yml
将以下配置保存为 docker-compose.yml。
⚠️ 注意:请务必修改配置中的
your_secure_password和GENERATE_RANDOM_KEY等敏感信息。
version: "3.8"

services:
  # --- 1. Web 节点 (只负责前端交互,速度最快) ---
  invidious:
    image: quay.io/invidious/invidious:latest
    container_name: invidious-web
    restart: unless-stopped
    ports:
      - "3000:3000"
    environment:
      INVIDIOUS_CONFIG: |
        db:
          dbname: invidious
          user: kemal
          password: your_secure_db_password # [修改] 数据库密码
          host: invidious-db
          port: 5432
        check_tables: true

        # 性能优化:关闭通知与写入
        enable_user_notifications: false
        use_innertube_for_captions: true # 使用 Google 内部 API 获取字幕,更稳定
        playlist_length_limit: 500

        # 架构分离:完全禁用此容器的后台任务
        channel_threads: 0
        feed_threads: 0
        jobs:
          refresh_channels: { enable: false }
          refresh_feeds: { enable: false }
          clear_expired_items: { enable: false }

        # 外部服务配置
        invidious_companion:
          - private_url: "http://companion:8282/companion"
            public_url: "https://your-domain.com/companion" # [修改] 您的域名
        invidious_companion_key: "GENERATE_A_RANDOM_KEY_1" # [修改] 随机字串
        hmac_key: "GENERATE_A_RANDOM_KEY_2"            # [修改] 必须与 Worker 保持一致

    healthcheck:
      test: wget -nv --tries=1 --spider http://127.0.0.1:3000/api/v1/stats || exit 1
      interval: 30s
      timeout: 5s
    logging: &logging
      options:
        max-size: "1G"
        max-file: "4"
    depends_on:
      - invidious-db

  # --- 2. Worker 节点 (只负责脏活累活) ---
  invidious-worker:
    image: quay.io/invidious/invidious:latest
    container_name: invidious-worker
    restart: unless-stopped
    environment:
      INVIDIOUS_CONFIG: |
        db:
          dbname: invidious
          user: kemal
          password: your_secure_db_password # [修改] 与 db 保持一致
          host: invidious-db
          port: 5432
        check_tables: true

        # 架构分离:在此容器启用后台任务
        channel_threads: 2
        feed_threads: 2
        jobs:
          refresh_channels: { enable: true }
          refresh_feeds: { enable: true }
          clear_expired_items: { enable: true }

        hmac_key: "GENERATE_A_RANDOM_KEY_2" # [修改] 必须与 Web 端一致

    logging: *logging
    depends_on:
      - invidious-db

  # --- 3. 辅助组件 ---
  companion:
    image: quay.io/invidious/invidious-companion:latest
    container_name: invidious-companion
    environment:
      - SERVER_SECRET_KEY=GENERATE_A_RANDOM_KEY_1 # [修改] 与上面的 companion_key 一致
    restart: unless-stopped
    logging: *logging
    read_only: true
    volumes:
      - companioncache:/var/tmp/youtubei.js:rw
    security_opt:
      - no-new-privileges:true

  # --- 4. 数据库 ---
  invidious-db:
    image: postgres:14
    container_name: invidious-db
    restart: unless-stopped
    volumes:
      - postgresdata:/var/lib/postgresql/data
      # 挂载相对路径的初始化脚本
      - ./config/sql:/config/sql
      - ./docker/init-invidious-db.sh:/docker-entrypoint-initdb.d/init-invidious-db.sh
    environment:
      POSTGRES_DB: invidious
      POSTGRES_USER: kemal
      POSTGRES_PASSWORD: your_secure_db_password # [修改]
    healthcheck:
      test: ["CMD-SHELL", "pg_isready -U $$POSTGRES_USER -d $$POSTGRES_DB"]

volumes:
  postgresdata:
  companioncache:
2. 启动服务
docker compose up -d💻 方式二:1Panel 面板部署 (推荐)
结合官方文档与 1Panel 特性,这是最稳妥的安装方式。官方强烈建议先克隆仓库以获取必要的数据库初始化脚本。
1. 准备项目文件 (终端操作)
通过终端直接拉取官方源码,确保数据库初始化环境完整。
- 登录 1Panel,进入 主机 -> 终端(或使用 SSH)。
- 执行以下命令创建目录并下载文件:
# 进入 1Panel 应用目录
cd /opt/1panel/apps

# 创建并进入 invidious 目录
mkdir -p invidious && cd invidious

# 克隆官方仓库到当前目录(注意最后的点 ".")
git clone https://github.com/iv-org/invidious.git .
2. 生成安全密钥
Invidious 需要两个唯一密钥。在终端继续执行:
# 生成第一个密钥 (用于 HMAC_KEY)
# 若提示 pwgen command not found,可改用: openssl rand -hex 16
pwgen 16 1

# 生成第二个密钥 (用于 invidious_companion_key)
pwgen 16 1记下这两个密钥,下一步会用到。
3. 创建容器编排
- 进入 1Panel 容器 -> 编排 -> 创建编排。
- 模式选择: 点击顶部的“编辑”圆点(不要选“路径选择”)。
- 文件夹: 填写
invidious(系统会自动识别为/opt/1panel/docker/compose/invidious)。 - 内容: 粘贴下方的 YAML。
version: "3"

services:
  # --- 1. Web 节点 ---
  invidious:
    image: quay.io/invidious/invidious:latest
    restart: unless-stopped
    ports:
      - "127.0.0.1:3000:3000"  # 仅监听本地
    environment:
      INVIDIOUS_CONFIG: |
        db:
          dbname: invidious
          user: kemal
          password: your_secure_db_password # [修改] 数据库密码
          host: invidious-db
          port: 5432
        check_tables: true

        # 性能优化
        enable_user_notifications: false
        use_innertube_for_captions: true
        playlist_length_limit: 500
        channel_threads: 0
        feed_threads: 0
        jobs:
          refresh_channels: { enable: false }
          refresh_feeds: { enable: false }
          clear_expired_items: { enable: false }

        # 辅助服务配置
        invidious_companion:
          - private_url: "http://companion:8282/companion"
            public_url: "https://your-domain.com/companion" # [修改] 您的域名
        invidious_companion_key: "KEY_1_FROM_STEP_2"       # [修改] 填写上面生成的第一个密钥
        hmac_key: "KEY_2_FROM_STEP_2"                   # [修改] 填写上面生成的第二个密钥

    depends_on:
      - invidious-db

  # --- 2. Worker 节点 ---
  invidious-worker:
    image: quay.io/invidious/invidious:latest
    restart: unless-stopped
    environment:
      INVIDIOUS_CONFIG: |
        db:
          dbname: invidious
          user: kemal
          password: your_secure_db_password # [修改]
          host: invidious-db
          port: 5432
        check_tables: true
        # 启用后台脏活
        channel_threads: 2
        feed_threads: 2
        jobs:
          refresh_channels: { enable: true }
          refresh_feeds: { enable: true }
          clear_expired_items: { enable: true }

        hmac_key: "KEY_2_FROM_STEP_2" # [修改] 必须与 Web 端一致
    depends_on:
      - invidious-db

  # --- 3. Companion (辅助代理) ---
  companion:
    image: quay.io/invidious/invidious-companion:latest
    restart: unless-stopped
    ports:
      - "127.0.0.1:8282:8282" # 映射 8282 端口供 Nginx 反代
    environment:
      - SERVER_SECRET_KEY=KEY_1_FROM_STEP_2 # [修改]
    read_only: true
    volumes:
      - companioncache:/var/tmp/youtubei.js:rw
    security_opt:
      - no-new-privileges:true

  # --- 4. 数据库 ---
  invidious-db:
    image: postgres:14
    restart: unless-stopped
    volumes:
      - postgresdata:/var/lib/postgresql/data
      # 使用 1Panel 绝对路径挂载
      - /opt/1panel/apps/invidious/config/sql:/config/sql
      - /opt/1panel/apps/invidious/docker/init-invidious-db.sh:/docker-entrypoint-initdb.d/init-invidious-db.sh
    environment:
      POSTGRES_DB: invidious
      POSTGRES_USER: kemal
      POSTGRES_PASSWORD: your_secure_db_password # [修改]
    healthcheck:
      test: ["CMD-SHELL", "pg_isready -U $$POSTGRES_USER -d $$POSTGRES_DB"]

volumes:
  postgresdata:
  companioncache:
4. 创建网站并开启 HTTPS
- 在 1Panel 网站 -> 创建网站。
- 运行环境: 选择
反向代理。 - 主域名: 填写您的域名(如
vid.example.com)。 - 代理地址: 填写
127.0.0.1:3000。 - 创建成功后,进入该网站的 网站设置 -> HTTPS,申请并启用证书。
5. 修改 Nginx 配置 (配置 Companion 转发)
这是确保视频加载流畅的关键一步。我们需要手动注入 Companion 的转发规则。
- 进入 网站设置 -> 配置文件。
- 找到
location ^~ / { ... }块,在其下方(即}之后)添加以下代码:
    # === Invidious Companion 专用规则 ===
    location /companion {
        proxy_pass http://127.0.0.1:8282;
        proxy_set_header X-Forwarded-For $remote_addr;
        proxy_set_header Host $host;
        proxy_http_version 1.1;
        proxy_set_header Connection "";
}- 点击 保存并重载。
5. 资源限制和压榨配置的版本
version: "3"

services:
  # ==========================================
  # 1. Web 服务 (只负责前端交互)
  # ==========================================
  invidious:
    image: ghcr.io/sjnhnp/invidious:latest
    restart: unless-stopped
    ports:
      - "127.0.0.1:3000:3000"
    deploy:
      resources:
        limits:
          cpus: '0.80'     # 限制使用 80% CPU
          memory: 400M     # 限制内存 400M
    environment:
      INVIDIOUS_CONFIG: |
        db:
          dbname: invidious
          user: kemal
          password: kemal
          host: invidious-db
          port: 5432
          pool: 5          # 连接池限制
          idle_pool: 1
        check_tables: true

        # --- 性能优化 ---
        enable_user_notifications: false
        use_innertube_for_captions: true
        playlist_length_limit: 100
        cache_annotations: false
        statistics_enabled: false

        # --- 默认偏好设置 ---
        default_user_preferences:
          local: false      # 默认关闭代理
          quality: "dash"
          autoplay: false

        # --- 架构分离:禁用后台任务 ---
        channel_threads: 0
        feed_threads: 0
        jobs:
          refresh_channels:
             enable: false
          refresh_feeds:
             enable: false
          clear_expired_items:
             enable: false

        # --- 外部服务 ---
        invidious_companion:
          - private_url: "http://companion:8282/companion"
            public_url: "https://techcrunch.9527000.xyz/companion"
        invidious_companion_key: "Xo3ietu6lu4ealua"
        hmac_key: "oe7af5yaeGh8Ilio"

    healthcheck:
      test: wget -nv --tries=1 --spider http://127.0.0.1:3000/api/v1/stats || exit 1
      interval: 30s
      timeout: 5s
      retries: 2
    logging: &logging
      options:
        max-size: "10m"
        max-file: "3"
    depends_on:
      - invidious-db
      - companion          # 等待 Companion 启动

  # ==========================================
  # 2. Worker 服务 (后台任务)
  # ==========================================
  invidious-worker:
    image: ghcr.io/sjnhnp/invidious:latest
    restart: unless-stopped
    deploy:
      resources:
        limits:
          cpus: '0.20'     # 仅允许 20% CPU
          memory: 256M
    environment:
      INVIDIOUS_CONFIG: |
        db:
          dbname: invidious
          user: kemal
          password: kemal
          host: invidious-db
          port: 5432
          pool: 3
        check_tables: true

        # --- 启用后台任务 ---
        channel_threads: 1 # 单线程
        feed_threads: 1    # 单线程
        jobs:
          refresh_channels:
             enable: true
          refresh_feeds:
             enable: true
          clear_expired_items:
             enable: true

        hmac_key: "oe7af5yaeGh8Ilio"

    logging: *logging
    depends_on:
      - invidious-db
      - companion

  # ==========================================
  # 3. 辅助服务
  # ==========================================
  companion:
    image: quay.io/invidious/invidious-companion:latest
    deploy:
      resources:
        limits:
          memory: 300M    # 【修正】放宽到 300M 以防启动崩溃
    ports:
      - "127.0.0.1:8282:8282"
    environment:
      - SERVER_SECRET_KEY=Xo3ietu6lu4ealua
    restart: unless-stopped
    logging: *logging
    cap_drop:
      - ALL
    read_only: true
    volumes:
      - companioncache:/var/tmp/youtubei.js:rw
    security_opt:
      - no-new-privileges:true

  # ==========================================
  # 4. 数据库
  # ==========================================
  invidious-db:
    image: docker.io/library/postgres:14
    restart: unless-stopped
    deploy:
      resources:
        limits:
          memory: 300M
    volumes:
      - postgresdata:/var/lib/postgresql/data
      - /opt/1panel/apps/invidious/config/sql:/config/sql
      - /opt/1panel/apps/invidious/docker/init-invidious-db.sh:/docker-entrypoint-initdb.d/init-invidious-db.sh
    environment:
      POSTGRES_DB: invidious
      POSTGRES_USER: kemal
      POSTGRES_PASSWORD: kemal
      POSTGRES_INITDB_ARGS: "--auth-host=scram-sha-256"
    command:
      - "postgres"
      - "-c"
      - "shared_buffers=128MB"
      - "-c"
      - "max_connections=50"
    healthcheck:
      test: ["CMD-SHELL", "pg_isready -U $$POSTGRES_USER -d $$POSTGRES_DB"]

volumes:
  postgresdata:
  companioncache:
🧐 常见问题 Q&A
Q: 为什么要有两个 quay.io/invidious/invidious 容器?
A: 术业有专攻。 Invidious 的后台刷新任务(更新订阅用的)非常消耗资源。如果把这些任务和处理用户访问放在同一个容器里,一旦后台开始大量刷新,前台网页就会卡顿。拆分后,Web 容器永远保持空闲响应用户,Worker 容器慢慢在后台跑任务,互不影响。
評論